
For SharePoint Online (Office 365) or Client-Side Only Mode
To install your custom Search Mask XML definition in MacroView DMF or Message, you simply need to host the search mask(s) on your SharePoint Online (Office 365) tenant, then point MacroView DMF or Message to that location.
First, upload your O365Mask.xml file to a location hosted on your SharePoint Online (Office 365) tenant. Your O365Mask.xml file should contain all search masks you intend on using with MacroView DMF or Message, including the Email Search and Keyword Search provided by default and any custom ones you have created.
If you have your Search Mask XML definition(s) spread across multiple files, copy and paste them into the O365Mask.xml file before proceeding with the upload.
![]() Tip: If you have multiple servers registered in DMF or Message and are using MacroView DMF 8.5 or later, you can define a different set of search panels for each server or for specific groups of users. Refer to Managing client side search panels changes for more information.
Tip: If you have multiple servers registered in DMF or Message and are using MacroView DMF 8.5 or later, you can define a different set of search panels for each server or for specific groups of users. Refer to Managing client side search panels changes for more information.
After the upload is complete, you'll need to point MacroView DMF or Message to the location of your search mask file or files:
- Open Microsoft Outlook, select the MacroView ribbon tab and click Options.
- Select the General tab on the left panel and navigate to the section titled Search.
- Next to the Client side search mask location option, click the grey box to browse to the file's location.

- Close Microsoft Outlook, DMF Explorer (if applicable) and the MacroView DMF Local Service.
- Open Microsoft Outlook, click on the Search view at the bottom of the MacroView pane on the right side of the Outlook window.
- Click the Search Type drop down and view your newly installed search panels.
For SharePoint Server (on-premises)
Using client side search masks
Search masks for on-premises SharePoint servers are by default installed on the SharePoint server. If you are using MacroView DMF 8.5 or later and you are not familiar with SharePoint server administration, or want an easier way to manage your DMF or Message search panels, you can choose to configure the DMF or Message client so that all on-premises SharePoint servers use client side search masks as detailed in the section above. To do this:
- Open Microsoft Outlook, select the MacroView ribbon tab and click Options.
- Select the General tab on the left panel and navigate to the section titled Search.
- Check the option to Use client side search masks for on-premises SharePoint servers.
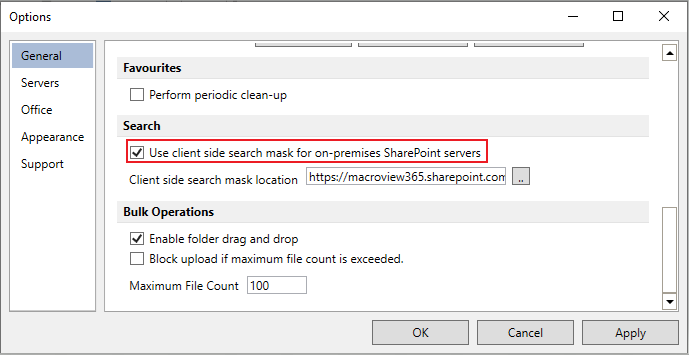
- Then set the client side search mask file location. See SharePoint Online (Office 365) configuration above.
Note: Once the you enable the Use client side search masks for on-premises SharePoint servers setting the available search panels for ALL on-premises SharePoint servers will determined in the same way they are for client side only servers.
Installing search masks on the SharePoint Server
If you do not wish to use client side search mask follow the below instructions to install the mask on the SharePoint server.
Preface: The rest of section details how to upload and install your own search panel using custom Search Mask XML definition files to an on-premises SharePoint server. If you are not experienced in navigating the SharePoint Management Shell (command-line interface) contact MacroView Services to get in touch with a professional SharePoint consultant.
Before making any changes to your search panels, you will need to deactivate the MacroView DMF Search Web Application Feature.
To do this, you will need to:
- Have Farm Administrator permission level on your SharePoint server.
- In SharePoint Central Administration, navigate to Application Management and click Manage web applications.
- On this page select your SharePoint web application and click on Manage Features in the ribbon.
- Scroll to find MacroView DMF Search and click the Deactivate button.
With MacroView DMF Search deactivated, you are now ready to upload and install your custom Search Mask XML using the DMF Search Mask Manager. This tool is used to upload and install your custom Search Mask XML to your SharePoint Server (on-premises).
Download the version of DMF Search Mask Manager that corresponds with your version of SharePoint Server:
![]() DMF Search Mask Manager for SharePoint Server 2010
DMF Search Mask Manager for SharePoint Server 2010
![]() DMF Search Mask Manager for SharePoint Server 2013 onwards
DMF Search Mask Manager for SharePoint Server 2013 onwards
To install a search panel:
- Find and move your Search Mask XML definition file(s) into the same folder that contains the DMF Search Mask Manager.
- Using the SharePoint Management Shell, navigate to the unzipped folder containing the DMF Search Mask Manager and Search Mask XML definitions.
- Execute the following command in the SharePoint Management Shell:
.\DMF.SearchMasks.exe YOURSERVERURL YOURPATHTOXMLPANELSFILE
To delete a search panel:
- Using the SharePoint Management Shell, navigate to the unzipped folder containing the DMF Search Mask Manager.
- Execute the following command in the SharePoint Management Shell:
.\DMF.SearchMasks.exe -delete YOURSERVERURL 'PANELNAME'
After you have finished making the necessary changes, re-activate the MacroView DMF Search feature on the correct web application for the changes to take effect.