
Welcome to MacroView Case and Matter 365
Case and Matter 365 is a collection of MacroView software and plugins designed for law firms and legal departments to easily manage documents, emails and matters using SharePoint Online (Office 365).
Case and Matter 365 includes the following software, plugins and configurations:
- MacroView DMF
- MacroView Unique Document Numbering (UDN)
- MacroView Advanced Office Integration (AOI)
- Structure for SharePoint environment: sites for clients and document sets for matters
- Creation of site content types: Matter Document Set, Matter Document, Email
- Search panels: Matters, Matter Documents
- Shortcuts to: Create New Matter, Create New Document
This guide contains everything you need to get started with your first installation. Remember to sign into the MacroView Help Centre and have your license key ready before beginning this tutorial.
If you don’t have a MacroView Help Centre account, you can create one by clicking Sign in in the top right and selecting Sign up. If you haven’t got a license key you can evaluate MacroView Case and Matter 365 free for 30 days by completing an evaluation form.
You must have a Help Centre account and hold an evaluation or full license for MacroView Case and Matter to proceed with this guide. Click on the sections below to get started.
This section covers installing MacroView Case and Matter 365 to your local machine, licensing the package and setting up your SharePoint Online tenant.
Step 1: Download and Install the MacroView Case and Matter client
- Close Microsoft Office applications (Outlook, Word, Excel and PowerPoint) and Adobe Reader.
- Download the MacroView Case and Matter Client that corresponds with your version of Windows and SharePoint environment (eg SharePoint Online) from the Downloads site. The minimum software requirements for your computer are also listed on the Downloads site.
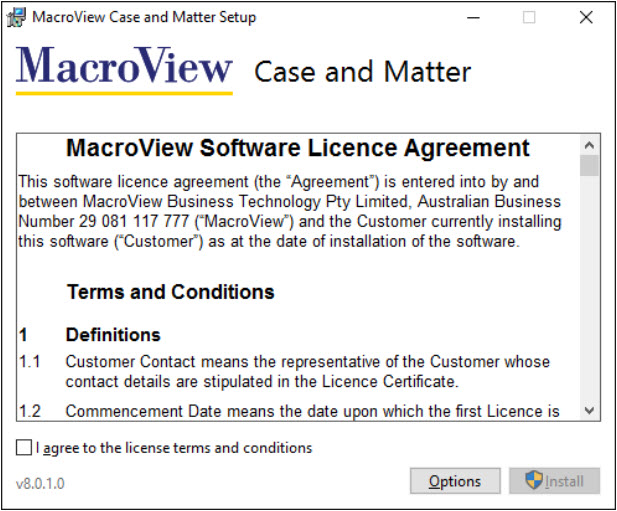
- Double-click the downloaded file to start the MacroView Case and Matter Setup Wizard.
- If you have received an additional license to evaluate MacroView ClauseBank you must click the Options button found on the license agreement page and check the box titled MacroView ClauseBank to include it in your Case and Matter installation.
- Click Install to begin installing MacroView Case and Matter 365.
Step 2: Add your SharePoint Online (Office 365) server
In this step you will enter your SharePoint Online (Office 365) tenant details to use with MacroView DMF. Once configured, the tenant will display in the MacroView tree view allowing you to interact with your SharePoint environment.
- First, double-click on the MacroView DMF desktop icon to open MacroView DMF Explorer.
- Open the File menu, choose Options and go to the Servers tab.
- Click Add to associate an existing SharePoint site collection with MacroView DMF.
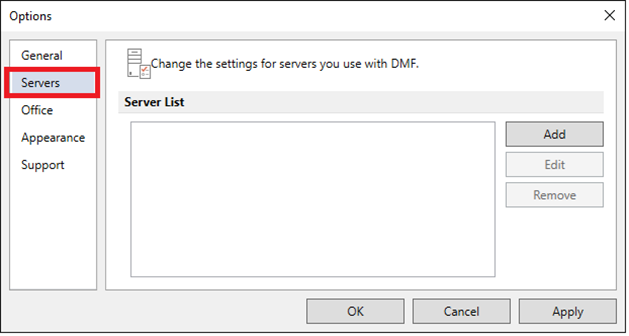
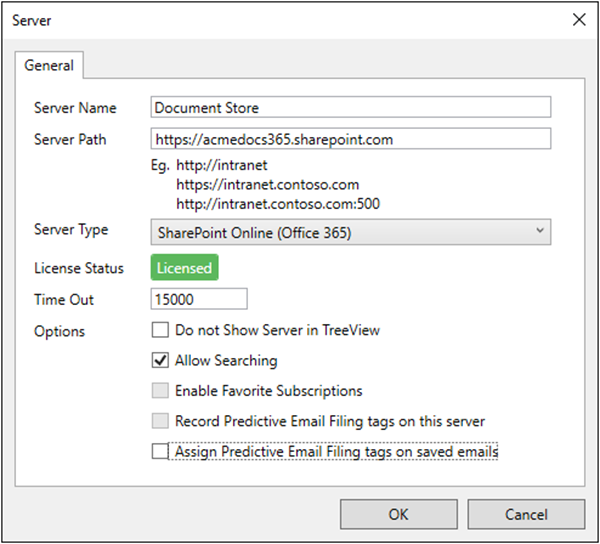
The Server window allows you to enter your SharePoint server location, create a server name and configure advanced settings.
- In the Server Name field, enter a display name for your Office 365 tenant. This will appear as a new top-level node in the Browse mode of MacroView DMF.
- In the Server Path box, enter the URL path to your SharePoint Online (Office 365) tenant.
- Note: You must have at least read access to the entered Server Path to activate the license.
- In the Server Type drop-down, select SharePoint Online (Office 365).
- Now that you have entered your server details, License Status will display one of the following:
-
 - This indicates that your SharePoint server path is valid but not yet licensed for use with MacroView DMF. Please continue to Step 3: Activate your MacroView product licenses.
 -
 - This indicates that your SharePoint server path has been verified and licensed with MacroView. Skip forward to the next major section, Section 2: Create and provision a new site collection.
-
 - This indicates that MacroView Licensing cannot contact your SharePoint location. As a first step, make sure your Server Path has been entered correctly. If your Server Path is correct and you're still experiencing this error, please see the following knowledge base article for troubleshooting: License status 'Unknown' after entering server path details.
-

Step 3: Activate your MacroView product licenses
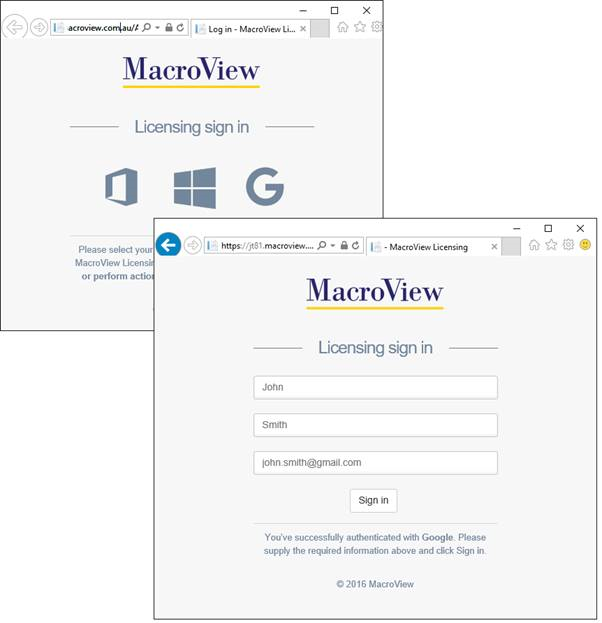
To license MacroView Case and Matter, click the Activate link to open the MacroView Licensing website.
- Login with your Office 365, Microsoft or Google account by choosing the appropriate icon and entering your details.
- MacroView recommends using a non-employee-specific account (e.g. admin@ or other group account) as the same account will need to be used for all subsequent activations of the license.
- You will be prompted by the relevant account provider to trust the MacroView Licensing site. You must grant this access in order to register the account.
- Click Sign in to load the Activate License page.
- After the licensing home page loads, select Licenses > Activate on the left navigation panel.
- Now, enter the license key (supplied by MacroView) in the field provided.
- Note: Your SharePoint Online (Office 365) server path should be entered automatically. Ensure your license key and server path are accurate, then click Next.
- The next window will display the MacroView products associated with your license key. Ensure that all your services are selected, then click Next.
- The confirmation page will now load displaying your license key, the SharePoint server associated with the license and the MacroView products that will activate. If these details are correct, click Next to proceed to the Licenses Summary page.

- Return to the Server dialog in MacroView DMF Explorer.
- Click Recheck to confirm that the newly added tenancy is licensed. The License Status will display a indicator if it is.
Understanding your MacroView licence
It's important to remember that your MacroView licence is not tied to an individual user, but to your:
- Server farm for SharePoint Server (on-premises), and/or
- SharePoint Online tenancy, for SharePoint Online (Office 365)
This means that your SharePoint environment only needs to be licensed with MacroView once, and the amount of users able to connect are limited by the amount of user seats your organisation has purchased.
If you want to find out more about MacroView licensing visit Managing MacroView 365 and Client Side Only licenses.
Introduction
Now that you have installed and licensed Case and Matter 365, you are ready to begin provisioning your SharePoint Online environment with the Case and Matter SharePoint design.
We recommend creating a new site collection to test Case and Matter 365 during your evaluation. This is to ensure that your evaluation does not impact your current SharePoint setup and/or production environment.
Download and install MacroView Provisioning
To create your new site collection and set up other SharePoint sites and libraries, we recommend installing and using the MacroView Solution Provisioning plugin/extension.
This extension is included with your evaluation or product license and is designed to automate the creation and provisioning of SharePoint locations to be used with MacroView.
Before continuing with this section, please visit the MacroView Solution Provisioning user guide to find information on how to download, install and use the extension.
Create a new site collection
Once you have downloaded and installed MacroView Solution Provisioning for Case and Matter 365, sign in to DMF using your tenant administrator account and create your new site collection by:
- Right-clicking on the tenant node, hover over Create and select Site Collection.
- The Create site collection dialog will now appear, prompting you to enter the details of your site collection. Once you have entered your details, click OK to start the creation process (this normally takes a few minutes to complete).
- Once the process has finished, go to your tree-view, right-click the tenancy node and select Refresh to display your newly created site collection.
- Note: If the new site collection doesn't appear straight away, you may need to wait 5-10 minutes for the SharePoint search crawl to discover the new area before trying Refresh again.
Create your custom Document ID prefix
Once your site collection has been created, the next step is to define a custom document ID prefix to be added to each document as you save it to SharePoint. This prefix will appear at the beginning of all document IDs in your site collection.
The prefix must be 4-12 characters long, alphanumeric and should be representative of your organisation.
- In your MacroView tree-view, right-click your site collection and select Open in Browser
- Click the settings cog in the top right and choose Site Settings.
- Underneath Site Collection Administration, click Document ID settings.
- Tick the checkbox Assign Document IDs and create your own ID prefix in the field below.
- (Optional) You can also tick the checkbox Reset all Document IDs in this Site Collection... to rename any existing document IDs with the one you have just entered.
- Once you are complete, click OK in the bottom right to save your changes.

Document IDs have now been activated on your site collection. Remember, you will need to complete this step for each site collection you intend to use with Case and Matter 365.
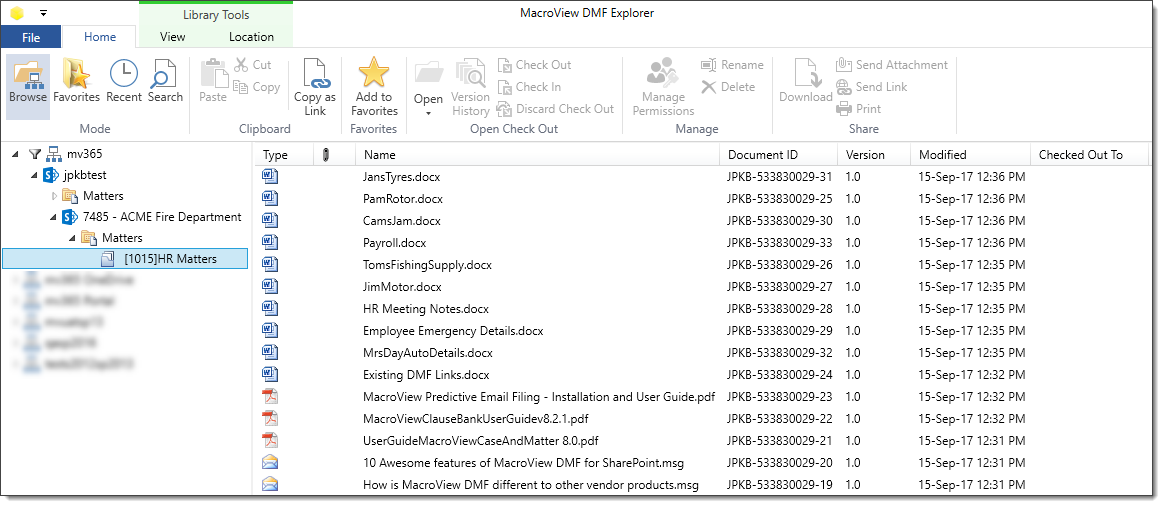
About the MacroView Case and Matter SharePoint structure
MacroView provide an out-of-the-box SharePoint structure designed to capture metadata important to law firms and legal departments.
If your organisation has an existing SharePoint structure or would like to customise the metadata captured by SharePoint, contact MacroView Services to get in touch with a professional SharePoint consultant.
The out-of-the-box structure contains the following:
- A site collection for each of your business projects and/or divisions (e.g. HR, Finance, IT, Clients).
- Each site collection contains sites relevant to that collection. For example, the site collection Clients will contain a SharePoint site for each of your clients (e.g. ACME Fire Department).
- Each site contains a SharePoint document library containing matters specific to that client.
See the screenshot below for a visual representation of the design.
For a detail explanation of the MacroView Case and Matter SharePoint structure and information on how to create a Matters document library, create new matter document sets and setup MacroView Case and Matter search, refer to MacroView Case and Matter Solution
Creating new matters
After completing the guide above, you will be ready to create a new matter in MacroView DMF.
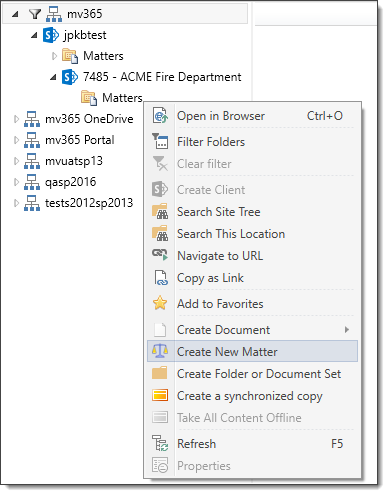
To do this:
- Right-click on the 'Matters' library created in your new client site.
- Select the Create New Matter option.
- The Create New Matter dialog will appear, prompting you to enter properties for your new matter including, but not limited to:
- Matter Name
- Matter Type
- Matter Status
- Matter Managed By
- After you fill in these properties, click the OK button to create your matter.
- You can now use MacroView DMF to drag-and-drop, save, open and store documents and emails in your new matter location.
Start using MacroView Case and Matter
More Information on MacroView DMF
- Using MacroView DMF 365 - Series of short videos that briefly demonstrate how you can use MacroView DMF 365 to manage documents and emails.
- Getting started with MacroView DMF - List of articles that show how to complete common tasks such as capturing metadata, automatic email filing and more. Recommended for beginners and existing users needing a refresh.
- Blog: Managing Documents and Emails in Office 365 with MacroView.
- Browse the MacroView DMF product page.
More Information on MacroView ClauseBank
-
Advanced Use of MacroView ClauseBank with Office 365
Web page documenting steps to install and take advantage of more advanced features of MacroView ClauseBank with SharePoint Online in Office 365. - Blog: Document Preparation Now Even Smarter with MacroView ClauseBank.
- Browse the MacroView ClauseBank product page.
Product support
- Log a support request or Email MacroView Support if you need help with your installation or have any questions regarding MacroView DMF 365.